Wednesday, September 27

Wednesday Baking II : Carrot cake Muffins with Cinnamon Glaze…


It’s Wednesday today, and just like last week, I’ve had a lovely quiet morning today, filled with baking, a bit of blogging and a
lo-hot of tasting.
This morning I made Carrot cake Muffins.
I just realized this is again a recipe with lots of raisins and cinnamon (!) Talk about coincidence…=)

The recipe is from Delia Smith. I love her Vegetarian Collection - it’s a big, beautiful book with simple and complicated recipes and the most amazing photo’s - even a simple potato looks gorgeous in here.
According to Delia this is the absolute best carrot cake there is. She worked on the recipe for years, carefully analysed it and made a lot of little adjustment over the years.

Changing the recipe seemed very stupid and completely sacrilege, so I followed the instructions precisely...
My only adjustment was the use of little muffin tins instead of two large cake pans. I was very pleased with the outcome; they were a lot easier to make and don’t they look sweet??
I’m very glad I didn’t change a single thing: this is indeed the best carrot cake ever

It’s sweet, dense and spongy and still fairly healthy judging all the ingredients...
You can taste all the different ingredients and flavours, but what really special is, is that not one single thing dominates in this cake – all the lovely flavours work together and are simply a perfect match!

Although I liked the cinnamon glaze, I prefer the muffin served just plain with the syrup…I love this syrup - It’s without a doubt the best addition ever for a carrot cake. It will be perfectly moist (but not wet!) unbelievably sweet and so delicious…
well, you just have to try it yourself ;)


Carrot cake Muffins with Cinnamon Glaze (makes 18 muffins)
base:
- 175g (1 cup packed) dark brown sugar
- 2 eggs
- 1 ½ dl (2/3 cup) sunflower oil
- 200g (1 2/3 cups) self raising flour (wholemeal)
- 1 tsp baking soda
- 3 tsp mixed spices (cinnamon, cloves, ginger, nutmeg and white pepper)
- 200g (= 1 ½ cups packed, when grated) carrots, scraped and roughly grated
- zest of one 1 orange
- 100g (½ cup) raisins
- 50g (2/3 cup) grated coconut
- 50g (½ cup) pecan nuts
syrup:
- juice of one little orange
- 1 Tbsp lemon juice
- 75g (½ cup packed, minus 3 Tbsp) dark brown sugar
glaze:
- 125g (1/2 cup) mascarpone
- 100g (1/2 cup) fresh cream cheese (8%fat)
- 2 tsp cinnamon powder
- 3 tsp brown sugar
- 50g (½ cup) pecan nuts (for the topping)

1. Preheat oven to 200°C (400°F)
Make the cinnamon glaze first: whip all ingredients together until they’re creamy, cover with plastic foil and refrigerate for 1 to 2 hours.
Divide all the pecan nuts (100g) over a baking sheet. Grill for 6 minutes and turn oven back to 170°C (325°F)

2. Cut half of the amount of nuts roughly up for the cake base, and the rest very finely for the topping.

3. In the bowl of an electric mixer, mix sugar, eggs and oil for about 2 to 3 minutes, until sugar is completely dissolved. Sift flour, baking soda and mixed spices (put back the grains!) stir and add the ingredients to the cake base.

4. Butter and flour a muffin pan and a small cake pan. Pour base in forms (don’t fill them completely! About 2/3) and bake for 30 minutes, well risen and firm. When they stick to their forms, bake for another 2 to 3 minutes and check again. Leave them in their tins and make the syrup.

5. For the syrup: whisk together both citrus fruits and add in the sugar. Mix well. Prick (with a toothpick) little holes in the muffins/cake and divide and pour over the syrup.

6. Let cool completely. Take them out off their forms and spread (if you wish...) with cinnamon glaze. Sprinkle with chopped pecans and enjoy…

Saturday, September 23

Wednesday Baking: Cinnamon Raisin Bread


On Wednesday I’ve two classes plus my first one starts at two in the afternoon - no wonder my favourite school day is Wednesday.
I love I don’t have to set on the alarm and I can spend the whole morning wandering around alone and in my pyjamas.
It’s beginning to become a bit of a habit to use this time to keep my blog a bit updated and, maybe you already guessed, bake something.
When I wake up on this Wednesday morning, the house is empty and it’s completely silent.- I make my morning cappuccino in peace, turn on the radio and start leafing through my cookbooks (a bit drooling…) and looking for something to make.

This morning, absorbed in one of my favourite and most used cookbooks - Martha Stewart’s Baking Handbook - I spotted this recipe for Cinnamon Raisin Bread. I love cinnamon. It’s without a doubt my favourite spice, I put it always on my cappuccino and have the tendency to double or triple the amount that’s asked for in my recipes.
In short - this recipe sounded just perfect (especially with another cappuccino!) and I started my Wednesday morning baking session

I have to say - I hope I don‘t sound too cocky… - everything I’ve made so far from cookbook recipes with a picture, looked very similar or sometimes even identical, as my outcome.
The only real surprises came from the experimental baking…
Well, up till now. This time my making didn’t even look slightly as the picture out the book…

Martha Stewart’s picture of this Cinnamon Raisin Bread was light, airy and well, very breadlike. Although it was a bit of a shock mine wasn’t, - I think my yeast didn’t do his job so well... - it was yet one of the best, extremes things I’ve ever tasted. I can't imagine Martha’s version had been any better or have more flavour than my version…

It was delicious, I loved it. It was compact, a bit cookie-ish and soft, and completely perfumed with cinnamon and sugar. Luscious golden-brown and with an amazing over-the-top sweet sticky cinnamon-syrup-swirl inside. It’s indescribable. The texture was perfect and if you had told me about this filling, I know I wouldn’t have believed that so much goodness would all been inside.
I didn’t wait and let cool completely before slicing, and a slightly warm, thick stream of cinnamon sugar came oozing out. Is it possible to get it more sinful or delicious than that?

The dough itself was wonderfully soft and warm, and a real pleasure to knead.
But keep in mind this isn’t a recipe you finish in an hour or so, it will definitely take you a while with all the rising and rolling, so pick a good moment and take your time (!)

A bit obvious; don’t eat this bread as a quick snack out the hand or for example when you’re dressed in white and you don’t have any napkins. Guaranteed trouble. Do devour it however, in thin slices and with a nice cup of tea (and plenty of napkins...)


Cinnamon Raisin Bread (makes 2 loaves)
- 1 envelope (¼ ounce/7g) active dry yeast
- 480 ml (2 cups) warm milk
- 950g (6 ½ cups) all-purpose flour, plus more for dusting
- 115g (1 stick/½ cup) butter, room temperature, cut into pieces, plus more for pans
- 100g (½ cup) sugar
- 2 eggs, plus 1 egg, lightly beaten
- 2 ½ tsp coarse salt - 200g (1 cup) raisins
- 1 Tbsp ground cinnamon
filling:
- 300g (1 ½ cups) dark brown castor sugar
- 2 Tbsp ground cinnamon

1. In the bowl of an electric mixer, sprinkle the yeast over the warm milk and whisk to combine. Add the flour, butter, sugar, 2 eggs, and salt. Attach bowl to mixer fitted with the dough hook. Mix on low speed until all the ingredients are well combined, about 3 minutes. Raise speed to medium-low, and continue to mix until the dough is completely smooth and pulls away from the sides of the bowl, about 3 minutes more.

2. Turn out the dough on a lightly floured surface. Pat out the dough into a big round. Sprinkle with raisins and cinnamon and knead and fold until they are just incorporated. Place the dough in a lightly oiled bowl, and cover with oiled plastic wrap. Let rise in a warm place until doubled in size, about 1 hour.

3. Return the dough to a lightly floured work surface, and pat into a round. Fold the bottom third of the dough up, the top third down and the right and left sizes over, pressing down the seal. Return the dough into the bowl and let rise again until doubled in bulk, about 40 minutes.

4. Make the filling. Combine sugar and cinnamon with 2 Tbsp water in a small bowl.

5. Generously butter two 9by5-inch loaf pans (if you don’t have two, one 7 inch round spring form) set aside. 6. Return the dough to a lightly floured work surface, and divide in half. Roll each half out to a large rectangle, a bit bigger than your loaf pans - about 10 inch. Brush with beaten egg and sprinkle each with half of the filling.

7. With the short end of the rectangle facing you, fold in both of the long sides of the dough in. the roll the dough towards you, gently pressing forming a tight log. Roll back and forth to seal the seam. Place loafs in the prepared pans. Cover loosely with oiled plastic wrap, and let rest in a warm place, about 30 minutes. Meanwhile, preheat oven to 225°C (425°F)

8. Brush the tops of the loafs with beaten egg, and transfer pans to the oven. Bake, rotating pans halfway through, until loaves are golden brown, about 45 minutes. If the tops begin to brown too quickly, tent with aluminium foil.) turn out the bread onto a wire rack to cool completely before slicing. (if you can wait…) The bread can be kept, wrapped in plastic up to 4 days.

Monday, September 18

Prinsjesdag & Royal Cookies

Every third Tuesday of September - as tomorrow - is Prinsjesdag.
Prinsjesdag, literally translated day of the princes, is the official opening of the Dutch parliamentary year. On this day the Queen rides in her Gouden Koets (Golden Coach) all the way through The Hague. She begins her route at the Noordeinde Palace and ends at the Dutch Parliament on het Binnenhof.

Here, in de Ridderzaal, she reads her annual speech in which she introduces the plans of the government, together with the national budget for the Netherlands for the new year.
The name ‘Golden Coach’ is in fact a bit misleading, since the wood is only partially gilded; the rest of it is painted. The carriage is decorated with symbolic motifs and is drawn by eight horses...

Prinsjesdag is a real festive day here in Holland; flags are hanged out and the whole city is orange. (the Royal name is Van Oranje-Nassau… oranje means orange!)
There is carnival, thousands of tourists come to The Hague and…we get a day off from school!
We can go watch the parade, look at the carriage, wave at the queen and - what I especially enjoy - go check out what kind of outfits with big ridiculous matching hats the royals picked out to wear this year! Maybe feathers this year? A pyramid, some vegetables, or simply some fruit?

Because my mother works in the second chamber, (part of the parliament) I grew up very close to all this and is it very fun to walk nonchalant by the tourists, past the security and go inside…!

The year I was 8 (a time where there weren’t terrorist alarms yet) my mum even found a short cut to Het Binnenhof and I could sneak all the way to the front and stand right next to the Golden Coach…=)
I’m not at all pro-royal, but yet I enjoy this day always very much.
Prinsjesdag seemed a good motive (and excuse!) for me to bake something orange, royal and of course, sweet!

I made these royal cookies with orange and ginger.
I adapted them from the classic gingerbreadmans -
added orange zest and orange juice, shaped them into little crowns and decorated them with a simple sugar glaze and orange muisjes.

These cookies are delicious, smell incredible and have a slightly orange hint. They are thin and crispy, a bit buttery and full of flavour. Although the glaze and decorating does give an extra touch, and is fun to do!, they are also delicious just plain.


Royal Orange Ginger Cookies (makes about 2 dozen)
- 420g (3 ½ cup) all-purpose flour, plus more for dusting
- 1 ½ tsp baking soda
- ¼ tsp salt
- 1 ½ tsp ground cinnamon
- 1 ½ tsp ground ginger
- 1 tsp ground allspice
- 225g (2 sticks/1 cup) butter, room temperature
- 150g (¾ cup) granulated sugar
- 135 g (¾ cup) packed dark-brown sugar
- 2 tsp orange zest
- 1 egg
- 70g (¼ cup) unsulfured molasses
icing:
- 200g (1 cup) icing sugar
- 1to 2 Tbsp orange juice and 1 Tbsp orange zest

1. In a large bowl, whisk together flour, baking soda, salt, cinnamon, ground ginger, allspice. Set aside.

2. In the bowl of an electric mixer fitted with the paddle attachment, beat butter, both sugars and orange zest on medium speed until light and fluffy, 2 to 3 minutes. Beat in egg and molasses to combine. With mixer on low speed, slowly add the flour mixture, beating until just incorporated.

3. Turn out the dough onto a clean work surface. Divide in half, shape into flattened disks and wrap each in plastic. Refrigerate at least one hour or overnight.

4. Preheat oven to 180°C (350°F) and line to baking sheets with parchment paper. Set aside.
Remove dough from the refrigerator, and let stand until slightly soften. (this will help keep the dough from cracking when rolled.)
On a large piece of parchment paper lightly dusted with flour, roll the dough thinly out. Place the dough and parchment paper on another baking sheet (or a tray) and freeze until very firm, about 15 minutes.

5. Remove dough from freezer, working quickly, cut out large cookies with cookie cutters or your self invented ones with a knife. Using a wide metal spatula (or a cake-slice) transfer cut-outs to prepared baking sheets and bake, rotating sheets halfway through, for 12 to 15 minutes, until crisp but not darkened. - they will harden more when they cool! -
Transfer cookies and parchment paper to a wire rack to cool completely. Decorate if you want.
Cookies can be kept in an airtight container at room temperature for up to 5 days.

Icing:

sift the icing sugar above a bowl and pour in enough orange juice to get a very thick glace. Add the orange zest and mix well. It is better to get a glace that is too thick than a soft, runny one! Spoon the glace onto the cookies and wait a minute or so till it's completely hard.

Wednesday, September 13

Triple Love Biscotti

I’ve told you before about my undying love for kruidnoten.
So when I saw they - very logic since it’s half September… - had entered the shops, you maybe understand my first impulse was to buy the entire pile, rip open every bag and build my own kruidnoten-house where I could happily live in.
But I as well became a bit confused about it.
What was going on here? This isn’t normal! Do they think we don’t have a calendar - it’s 3 months till December! It’s just absurd!
Therefore I decided to go on strike and will refuse to participate in this ridiculous nonsense. I will be strong and will turn every kruidnoot down till half November!

Uhm…
Ok.
It's true.
I did buy one bag.
But I can explain it one hundred percent -
I had to buy it.
I needed them for the following Triple Love Biscotti…so it doesn’t count and I’m still strong and still on strike (!)

Now is the first love in ‘triple love biscotti’ explained.
The second and third love will be also clear when I tell you they contain chocolate and coffee.
They contain chocolate coffee. ;)

This combination of flavours and spices is just absolutely heaven and perfect with a nice cup of coffee…

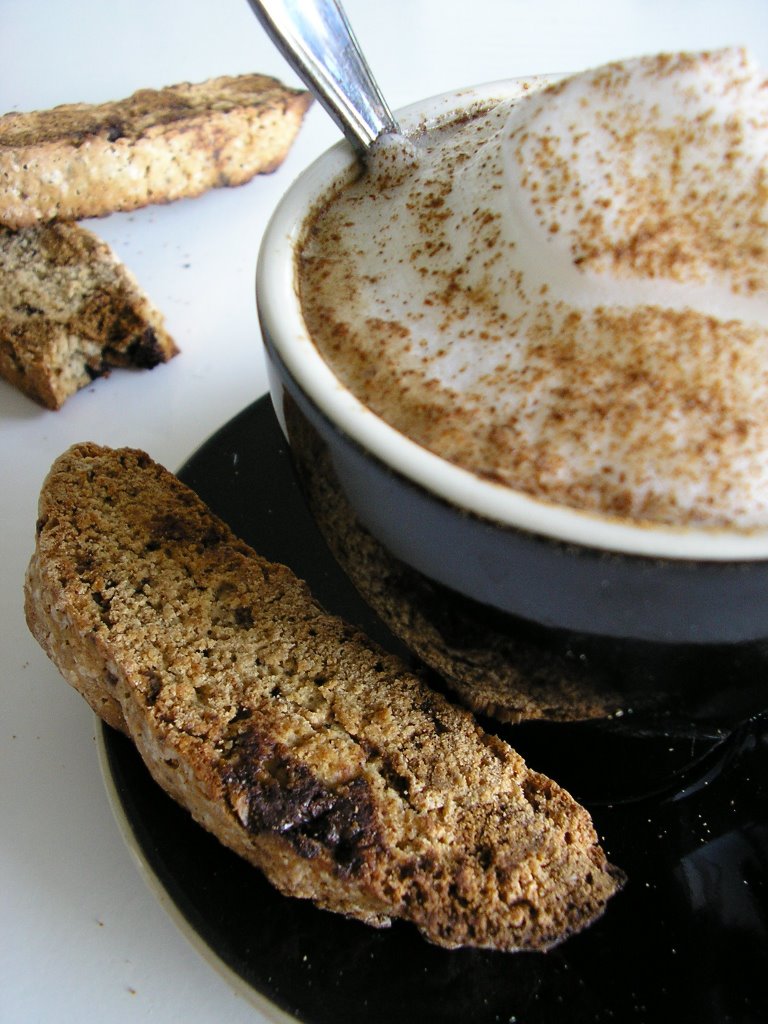
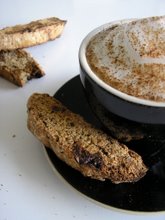
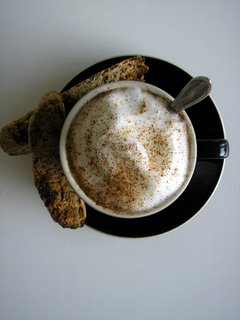
This biscotti (cantucci) is flavourful and exactly crunchy enough. It has a perfect subtle hint of coffee and the delicious big chunks of chocolate and kruidnoojes will melt a bit when you dunk it in your coffee…

I used my favourite biscotti recipe, which originally has hazelnuts (another love) instead of kruidnoten - also very, very good…

Triple Love Biscotti (makes bout 20)
- 280g (2 cups) all-purpose flour
- 150g (¾ cup) granulated sugar
- 1 tsp baking powder
- pinch of salt
- 1 tsp cinnamon powder
- 2 tsp instant espresso powder
- 3 eggs
- 1 tsp pure vanilla extract
- 100g (1cup) kruidnoten, roughly chopped
- 85g (½ cup) bittersweet chocolate, roughly chopped

1. Preheat oven to 150° C (300° F) and line a baking sheet with parchment paper

2. In a small bowl, whisk together eggs and vanilla extract. Mix in a large bowl flour, sugar, baking powder, salt, cinnamon and espresso powder. Add the egg mixture and beat until a dough forms, kneading with the back of your spoon and adding the chocolate and kruidnoten about halfway through.

3. Form a dough ball and divide it in two. Roll each half, on a lightly floured surface, out into a log - 20 cm long and 7 cm wide. Transfer them onto the prepared baking sheets and bake for 40 minutes, or until firm to touch.

4. Remove from oven and let cool for about 10 minutes

5. On a cutting board, using a sharp knife, cut slantwise both logs in slices, 1 to 2 cm tick

6. Arrange the slices on the baking sheet and bake for 10 minutes. remove them from the oven and turn slices over, bake again for another 10 minutes, until nice, firm and golden-brown on both sides.

7. Remove from oven and let cool. Store in an airtight container.


Tuesday, September 12

SHF23 Surprise Inside - Brownie Explosion...

Surprise!
I’m joining in the greatest Food Blogger’s sweet-tooth event: Sugar High Friday. This month’s theme is, big surprise!, Surprise Inside and is hosted by Alanna from A Veggie Venture.

I love my sweets but yet I had a hard time choosing what to enter.
What is the ultimate surprise?
Finding a broken nail from the hostess in your dessert is also a surprise, but not really the one I was hoping for…
But what then?
What’s the best base and what’s its best surprise?
The answer was actually rather simple: chocolate.
chocolate, chocolate and... chocolate!

I began a bit of experimenting and ended up making these dense and dark brownies. Very rich, pure, oozy and delicious. Instead of making one big one, I put them in individual little muffin-tins, and for the big surprise…
I buried cherry liqueur pralines inside them.

Can you really think of a nicer surprise than finding a soft kirsch centre, an explosion of flavour, inside the best brownie you’ve ever tasted?

The whole thing went quite well actually - I made the batter, placed the surprise-filling in the tins, covered them up and placed them in the oven… - but let’s just say it was a real surprise to find that after 20 minutes 12 little chocolate volcano’s had arisen in my oven, very angry and spewing out their lovely sugary-kirsch lava

OK, this was not really the surprise I was hoping for(!)

One tip, (in retrospect quite logic, but still…) make sure you completely cover up the bonbons - I used two different kinds of liqueur pralines (see photo above) and left the ones with those nice stems a bit uncovered…not my best move.
If you leave them uncovered, the alcohol will run out easily and vaporize when it’s chocolate layer melts…and they will turn out like this!

But luckily -surprise!- this didn’t ruin them at all (!)
they still looked very beautiful and they tasted absolutely amazing. Dark and dense, so rich and overwhelmingly chocolaty with still a delicious soft oozy kirsch centre…
Definitely worth a try!

I’ve added of course, - no surprise here - the recipe for you to try (and love)

Brownie Explosions (makes 16)

- 250g butter (2 sticks/1 cup)
- 250g best quality bittersweet chocolate (1,5 cup) chopped
- 4 eggs
- 325g (1 2/3 cup) fine granulated sugar
- 150g (1 ¼ cup) all-purpose flour
- pinch of salt
- 16 Cherry Liquor pralines.

1. Preheat the oven to 180° C (350° F) and grease and flour a muffin-tin

2. melt the butter and chocolate on low heat, stirring once in a while. In a large bowl, whisk together the eggs and sugar. Mix in a different bowl the flour and salt.

3. Take the chocolate mixture away from the heat when it’s completely melted, and let it cool off a bit before adding it to the eggs.

4. Add the chocolate mixture to the eggs and mix well. Add the flour and mix until you’ll have a smooth batter.

5. Place in every muffin tin a praline and cover them COMPLETELY with the batter. Fill every form. bake for 20 to 25 minutes, until done. The top will be dark and dry, but the centre still sweet, dense and compact. Be alert; the difference between a nice sticky brownie and a dried out one is just a couple of minutes!

6. Let them completely cool in their forms and keep in an airtight box.


Sunday, September 10

Blogging By Mail

A few weeks ago I found out about the Blogging By Mail project, this round organised by Stephanie from The Happy sorceress. The rules are simple:

Food bloggers from all over the world swap treats, baked good, recipes and more, sending a care package to a new friend. Cookies, cakes, jellies, breads, candies, teas and coffees, music, cookbooks, photos... Everyone who joins in will be given a swap partner to whom they'll send a package and you can fill your package with whatever you want to share.

Of course I immediately signed up - looking very forward to carefully put together my parcel, and not to forget, to receive my own little something (!)

My own parcel to send turned out to be very Dutch. I filled it with all kinds of things I love, but also tought of adding a lot of local Dutch stuff, things that would be completely new and unavailable on the other side of the globe.
Well, my package has just began its very long journey to its final destination. Please Mr. Postman; be nice and look out a bit for it, handle it with care so it will survive the shipping…!


And what a surprise was waiting for me last night…(!)

After a very long day at work - I just started my new job working in the kitchen of a grand cafĂ©/restaurant. - but this is really a different story… - I got home and found waiting for me…

MY PARCEL!! *whoe-hoe…!*

I wasn’t expecting it to be here so soon at all, but was very happy and excited - I instantly forgot my tiredness and opened anxiously my parcel…

O, and what a wonderful and beautiful stuff where inside! It turned out to come from Mademoiselle Differentiell out of Switzerland and she wrote a lovely letter, which I really enjoyed reading, where she a bit explained what she had send and why.

This is what I got;

Not one, not two, but three chocolate bars out of Switzerland! She had read on my blog that I like hazelnuts so she chose a hazelnuts-bar (isn’t that thoughtful??) and two extra fine dark ones…

A bottle of Rivella - Rivella is a soft drink and comes originally from Switzerland, but is actually being widely exported to many countries; including the Netherlands (!) So unfortunately I already knew it, but I like the gesture! =)

And last, but certainly not least, she added some delicious self-made goodies: a jar of dandelion marmalade which she has made quite often since kindergarten, Nidelzalte - caramel candies and sables. Of course far more than you can see on the photograph, but I couldn’t help it and started sampling…- quickly this was all that was left to photograph. I absolutely loved them! And I think Mademoiselle Differentiell had foreseen this a bit, because she added three nice little cards where she had written on the recipes! =)

Thank you for the lovely thoughtful presents M.D., I loved everything and can’t wait to try the Dandelion Marmalade on toast for breakfast tomorrow!

Now, I have just one little question remaining…
Where can I sign up for the next round of Blogging By Mail??! ;)

Wednesday, September 6

Kletskoppen

Some days I just crave for sweet. Often something in particular and once I’ve figured out what exactly, I just want to get a move on and make it as soon as I can. (or simply buy it of course…)
Well, last weekend I had this distinct urge for kletskoppen. Kletskoppen are caramelized peanut biscuits and beloved old-Dutch cookies.
Although you can buy them in every supermarket and almost every bakery sells them fresh, I decided to make them myself. I found many, many recipes on the net, all quite similar, so I just merged a few different ones, added to taste some more peanuts and finally ended up with this.

Figurative is a kletskop in Dutch someone who talks a lot and superficial, but this biscuit got its peculiar name - literally translated means it smack head - as a result of the preparation; when you put the dough on the baking sheets, you have to klets (smack) the tops with the back of a spoon and make them as thin as you can. This way you will get a lovely crispy cookie.

A kletskop is made of almost only sugar and will melt in the oven to a delicious crispy biscuit with little holes in it. They are sweet and crunchy, great to nibble on or served with dessert. ice cream for example.

Kletskoppen (makes 20 if you don’t snack to much of the dough…)

- 50 g peanuts, finely chopped
- 125 g brown castor sugar
- 1 tsp ground cinnamon
- pinch of salt
- 55 g butter, melted
- 50 g all-purpose flour

1. Preheat the oven to 200 ° C and line two large baking sheets with parchment paper.

2. Mix in a standard mixing bowl castor sugar, cinnamon powder and salt. Add the melted butter and mix until well blended. Add in parts the flour and chopped peanuts and mix until you’ll have a compact dough.

3. Shape little balls, about a tablespoon full, and place them with 10 cm space between them on the baking sheets. Smack them with the back of a spoon out as thinly as you can. Bake for 5 to 7 minutes until melted, paper-thin and golden brown. Leave them to cool and harden on the baking sheets and keep in an airtight box.

Tuesday, September 5

Babybundts

It’s safe to say terms as ‘extremely delicious’, ‘mouth-watering’ and ‘amazingly sinful’ are often used on many foodblogs. yes, that includes mine as well... I love reading foodblogs, and think these, maybe well used, expressions are quite important; you do want to pass on your experiences, share your enthusiasm and of course get others a bit drooling and craving for your delicious recipe (!) =)

There are beautiful blogs on my reading list that always amaze me with an original post and a special twist. I know how much time it can take to figure out exactly how to express what you want to say, and I think I’m not alone when I say I’m glad some others take this time and do this so lovely. It’s always nicer to read a passionate, detailed description of something than boring non-info like ‘this is a recipe for a cake. try it…’, right?!

Although I as well like to rattle on and give full descriptions when I think I’ve made something amazing, this time I’ll keep it a bit shorter and will not exaggerate. I think I’ll save that for a more over-the-top post. I promise those will come…! =)

These lovely moist cakes are called ‘babybundts’ - please don’t ask me why, because I really don’t know… - and I found the recipe in Nigella Lawson’s ‘How to Be a Domestic Goddess’
They are very easy to prepare and will not leave you with much of washing-up. I loyally obeyed to all the instructions - only I did add a good handful of raisins to the batter, which gave a nice extra bite.

I think this is a very good alternative for a normal plain cake; it’s quite basic and light, but the yoghurt gives it a twist and makes it very fresh and slightly sticky. This pairing with the sweet sugary icing is truly delicious…


Babybundts (makes 6)
- 125 g natural yoghurt
- 75 g salted butter, melted
- 2 large eggs
- rind of 1 lemon
- 150 g all-purpose flour
- 50 g (a good handful) raisins
- ½ tsp baking soda
- pinch of salt
- 125 g granulated sugar
icing:
- 200 g icing sugar
- juice of 1 lemon

1. Preheat the oven to 170° C and grease generously 1 mini-Bundts form for 6 - or if you don’t have that, muffin tins or little oven bowls

2. Mix in a measuring cup yoghurt, melted butter, eggs and lemon rind.

3. Mix in a large bowl flour, baking soda, salt and sugar.

4. Spatula the wet ingredients in the dry ones and mix well. Fill the prepared tins (half full!) and bake for 25 to 30 minutes.

5. Leave them to cool a bit before taking them out their forms (otherwise they’ll brake! but don’t wait too long, or they’ll be glued to their tins forever…) place with the flat side down, on a rack to cool.

6. For the glace, sift the icing sugar above a bowl and pour in enough lemon juice so you will get a thick glace. Cover the cakes with it and let it drip a bit down the sides.

Of course you can use all sorts of other citrus fruit for variation, oranges for example, or maybe lime and grapefruits…